Tuesday, December 28, 2010

Mug Rug & Decor Elements

This should be my last "Christmas" post. Decor elements were used on this mug and then I created a rug mug from SU's material by cutting it in the Big Shot with the scallop square die. I placed batting between the two pieces of material and then sewed by hand a little "x" with linen thread in each corner, added a button that can be found in the holiday mini and was done! You don't need to know how to sew to do this:)

I will have some birthday and Valentine's cards and projects coming soon, so make sure you check back.


Sunday, December 26, 2010

Christmas Decor Elements

First, let me apologize for the quality of these pictures. I could not get a good picture without the glare and then I could not get the platter so it was pictured on the side:(

I purchased the bowl and platter at Target and then decorated them using Decor Elements that are found in the Holiday mini catalog. They are so easy to apply. I have another mug that I applied decor elements to that I will be posting soon.


Saturday, December 25, 2010

Merry Christmas!

Merry Christmas to each of you! Have a wonderful day celebrating the birth of Jesus with your loved ones.


Thursday, December 23, 2010

Candy Cane Paint Can

This is one of my favorite 3-d items that I created this year. I took a clear paint can (found at craft stores) and put a candy cane decor element on it (the decor element is from the holiday mini). I simply cut a real red circle to cover the top, punched out a snowflake and used two way glue on it to add glitter. Ribbons were tied around the handle and a washer is tied to the side to open the can. I filled this one with whoppers, because I really like brown, red and white. This is an easy project. The only thing that takes some time is tying the ribbons, but it is a good task for in front of the t.v.!

Merry Christmas Eve:)


Tuesday, December 21, 2010

Rudolph!

Rudolph the red nose reindeer had a very shiny nose.....

My kids are waiting for Rudolph to bring Santa to our house and they won't have to wait much longer as Santa will be dropping the gifts off Wednesday night!

This "Rudolph" is a project we made in my daughter's class year for their Christmas party. As you can see it uses many different circle punches and the scallop circle punch. The chocolate chip card stock is wrapped around a Hershey candy bar. It's so cute and fun to make.


Monday, December 20, 2010

Soft Suede Christmas

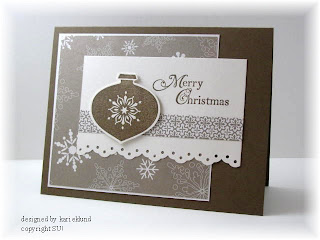
This is one style of Christmas card that I sent out this year. It uses retired designer paper. The paper was beautiful as it had a shimmer to it. The main card stock is soft suede and the white is shimmer white which went well with the designer paper. The ornament is stamped in soft suede ink and punched out using the ornament punch. I don't think there is a card I make that I don't use either punches or the Big Shot! The countdown to Christmas is on and I'm crossing things off of my to-do list, however, there is still more than enough for me to finish!

Thursday, December 16, 2010

Monogram Ornament

4 Days in a row posting! Yeah:) I really have been stamping, I just haven't been posting....

It was hard to get a good picture of this with a shiny surface, but trust me when I say it looks better in person! I made a monogram for each person in my family and used colors that fit their personality. This one pictured is for my husband, Steve, hence the "s". To make these, use the Big Shot with the Timeless Type Alphabet dies and vinyl. On this particular one, I used the clear vinyl so the letter looks like it is etched on it. I then tied ribbon on the top and that's it! If you decide to make these, I will warn you that it is a little tricky with the rounded surface and you have to make sure the bulb is big enough. In case you are curious and want to know, for me I did a brown ornament with a clear "k", Lily's ornament was silver with a turquoise "l", a red ornament and a white "n" for Noah, and Carter's ornament was silver with a red "c".

Thanks for stopping by my blog!


Wednesday, December 15, 2010

2010 Dominos

Some of you have seen these before, but I wanted to show you my 2010 version! If you have never made these, here are the directions....find an image that will fit on a domino, ink it up with black staz on ink, color in the image with a permanent marker (I use sharpies) and then apply crystal effects over the image. Once the crystal effects is dry, put sticky strip around the outside of the domino, attach ribbon, tie the ribbon at the top of the domino in a knot and then tie another knot at the end of the ribbon to make a loop for hanging on the tree. I like to tie these to the outside of gift bags. They are fun to make, easy and the recipients enjoy them! I am actually having my son's 2nd grade class make these at their Christmas party. I stamped on the domino for them, since the surface is a little slippery. Have fun making these!


A suggestion...even those these particular ones are ornaments, you could turn them into magnets or even necklaces. You don't need to be limited to Christmas and Christmas images!


Tuesday, December 14, 2010

Individual Smore

Aren't these the cutest things ever?!? They are individual smore packets. I used a small ziploc bag from a craft store to hold the 2 graham crackers, candy bar and snowman marshmallow peep. The topper was easy peasy to make using the scallop square die for the Big Shot (my all time favorite tool!). I then tied a ribbon and added a button. On the back, I attached directions....place one graham cracker on a plate and then layer the chocolate bar and peep on top. Heat in the microwave for approximately 25 seconds, take out and smoosh the other graham cracker on top....Enjoy! These make cute gifts. My kids love to watch the snowman grow big in the microwave.

Sunday, December 12, 2010

Candy Cones

I can't believe that it has been a month since I last posted! Where has the time gone? I have many projects to show you, I just need to get the pictures taken and a little "blurb" written up for each one:)

Are you looking for an easy, but cute packaging for candy or other little items? Then, these "candy cones" may be the answer. You can either make them simple or jazz them up with accessories. To make, cut a piece of designer paper 6x6 and then roll it! Attach the two sides using sticky strip and then decorate. These would also work well to place on the table at each person's table setting at Christmas. Let me know if you make any.